I have a Love/Hate relationship with our generator. It's a Fischer Panda 6.5hp with a Kubota Z482-E 2-cylinder diesel engine. We use it primarily for running our 230V water-maker and our 230V dive compressor, so we tend to run it every three days for an hour or so. It's a very clever piece of German engineering - very compact and has many sensors to prevent damage if something goes wrong, (which can be a problem because it's too clever).
|
|
|


Overview
Diesel engines are fairly simple things - to start a diesel you need:
- Fuel - clean, bubble free diesel
- Air - continual circulation of fresh, oxygen rich air and a clear exhaust system
- Heat - from compression and/or glow plugs
- Turn it over fast enough to obtain compression
The Control Panel is designed to monitor various temperature, pressure and other sensors and, if there is a problem, then the fuel pump is switched off. This is good if a real fault occurs on the generator, but any electrical fault with the warning sensor circuit will also cut off the fuel pump, making it impossible to start the generator. In addition the electrical system has three relays for the Starter Motor, the Heat Plugs and the Fuel Pump - any failure of these or intermittent faults will cause a problem. There are also three fuses - one in the back of the Control Panel and two more for the Start and Fuel Pump circuits. Lastly there is an Earth Isolation Relay which connects the battery negative to the generator chassis - this affects the Starter and Glow Plug circuits.
Electrical System

The circuit diagram is comprehensive, but here is a description of the main elements of the circuit.
When the power button is pressed, the 12V circuit is activated and the control panel checks the 8 temperature and pressure sensors. If there is a problem with a sensor, then normally one of the warning lights on the control panel is lit EXCEPT two of the sensors (Winding Temperature and Oil Temperature) do not have any warning lights. If there is a problem with a sensor, then the Control Panel will NOT switch on the Fuel Pump. If all sensors are okay, then the Fuel Pump Relay will be activated. This will activate the Fuel Pump and the Fuel Solenoid Valve.
When the Heat button is pressed, the Earth Isolation Relay and the Glow Plug Relay are activated. The Earth Isolation Relay connects the Battery Negative to the Generator chassis. The Glow Plug Relay supplies 12V to the Glow Plugs (which use the Chassis as ground).
When the Start button is pressed, the Earth Isolation Relay and the Starter Relay are activated. The Starter Relay supplies 12V to the Starter Solenoid (which use the Chassis as ground). The Starter Motor obtains power from a direct feed from the Starter Battery.
There's also a "clever" VCS circuit board, which varies the speed of the generator using a small DC motor. The idea is to increase the revs when the generator is under heavy load. On our generator, the VCS PCB is faulty and a new one costs a small fortune, so five years ago, I disconnected this circuit and our generator is locked to a constant speed.
To check the voltages on the various signal wires, it's easier to work with the connector behind the Control Panel, which can be easily pulled out after removing the four mounting screws.
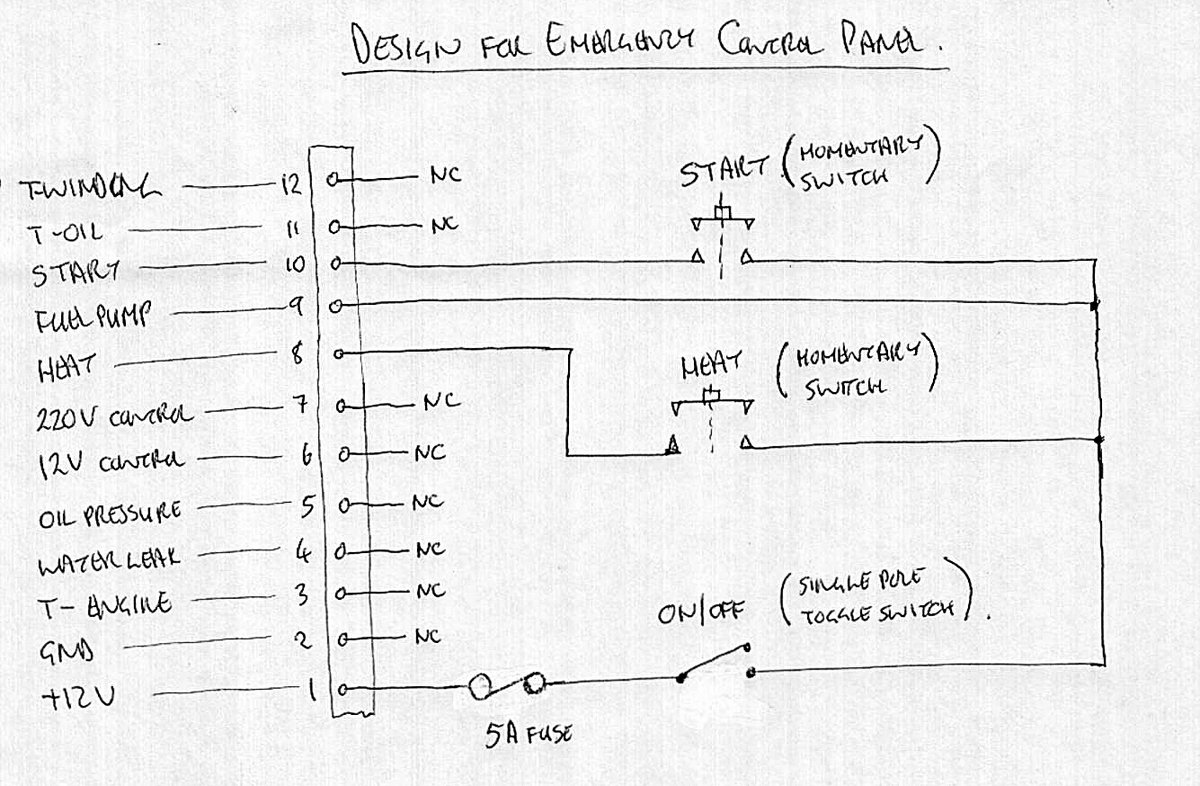
If you have a faulty Control Panel, then I've come up with an "Emergency Control Panel" circuit design that only needs a few switches and a fuse.
Initial Fault Finding
If the generator has been running okay and then fails to start (or the engine speed varies rapidly), then it's likely to be fuel or an electrical problem with the safety circuits. My initial approach is the following:
1. Turn on the power on the Control Panel. If the green light doesn't come on then check the 0V and 12V circuits - there are two fuses beneath the electrical connection panel on the generator. There is also a small fuse behind the control panel.
2. If there are any red warning lights showing on the Control Panel then the generator won't start. It's probably an electrical fault/loose connection on one of the eight sensors. (See Electrical System section)
3. Press Preheat for 8 seconds - not necessary in the tropics, but we always do it.
4. Press the Start button. If the Starter Motor doesn't turnover, then check the StarterCircuit.
5. If the Starter Motor runs, but the engine doesn't start, then it's likely to be fuel or air.
|
|
|


6. Use the black Override Button. This is located below the electrical connection panel on the generator. It will bypass the "clever" protection circuitry in the Control Panel, which is designed to switch off the fuel pump. While you are holding in the Override Button, get someone to press the Start button. If it starts, but then stops when you release the Override Button, then the problem is likely some fault in the fuel electrical circuit. (See Checking the Fuel System).
7. If it won't start with the Override Button, then first check the Air Filter - it's easy to do and not messy, so best to eliminate it first. Unscrew the 6 bolts on top of the air filter case. With the air filter open, try to start again (with the Override Switch both pressed and not pressed). If it starts then clean the air filter in soapy water and check the "cow catcher" filter on the end of the air intake tube.
8. If the air circuit is okay and the generator still won't start, then it's probably the fuel system. (See Checking the Fuel System)
9. If the fuel system all looks okay (or you've done some major work to the generator), then you need to be a bit more aggressive and follow the Desperation Starting section - it might be something else other than the fuel system.
Checking the Fuel System
This covers isolating electrical faults as well as checking the diesel flow to the injectors. As mentioned before, the safety circuits in the control panel will switch off the fuel system.
The fuel is lifted from the diesel tank by a small electrical pump located on top of the fuel tank (which on our boat is underneath the saloon table). The diesel goes through a Perkins Fuel filter, then through a small in-line filter next to the crankshaft pulley. Next is a Fuel Solenoid Valve, which when activated, allows fuel through to the Injector Pump which delivers high pressure fuel to the two injectors. The Fuel Pump is controlled via a 12V relay and the Fuel Solenoid Valve is also controlled by the control panel and is the primary method of stopping the generator.
If the generator starts, but runs with varying revs like it is about to cut out, then press the Over-ride button. If the generator runs smoothly with the Override button pressed then it is likely to be a a loose connection on the Fuel Pump Relay and/or the various sensors. The three relays should have a plastic cover to hold them in place, but the Fuel pump relay can vibrate loose in its holder - an easy way to check is to simply press or wriggle the relay to see if it runs smoothly. (Sometimes, I've put a bit of cardboard under the cover to hold the fuel pump relay tighter.)
If the generator won't start then, do the following:
1. With the Control Panel switched ON, press the Override Button and get someone to check that the fuel pump runs. It will make a clicking sound as it delivers small "pumps" of fuel. On our boat it's under the floor boards to the starboard side of the aft leg of the saloon table and I can hear it clicking by putting my ear to the floor boards.
2. Check that the Perkins primary diesel filter is not blocked up. Maybe change the filter while you're there.
|
|
|


3. With the Control Panel switched ON, press the Override Button and loosen the bleed screw on the Fuel Solenoid Valve. You should get a fair amount of fuel coming out without air. If there are bubbles, continue bleeding until the diesel is clear. If no fuel is coming out then check that the secondary filter is not blocked. (Loosen the lower pipe going IN to the filter to check that fuel is getting there. Another reason for no fuel here is that the Fuel Pump is faulty even though it is running.
4. Crack open both of the Injector Nuts and get someone to press the Start button. Fuel should come out of the nuts without air. (NOTE: On our generator, the diesel doesn't spurt out like I would expect, so don't worry too much if the fuel just dribbles out.) If there are bubbles, continue bleeding until the diesel is clear - DO NOT run the starter motor for more than 30 seconds. Be careful, the generator may start up, so keep well away from the fan belt. Close the Injector Nuts, preferably while the starter (or engine) is running.
5. If you are not getting fuel to the injectors, then the next thing to suspect is the Fuel Solenoid Valve. Switch the Control Panel OFF. Place a screwdriver tip on the Fuel Solenoid Valve body and the handle against your ear. Get someone to switch the Control Panel ON and OFF, you should hear a clicking noise as the solenoid operates.
6. If the Fuel Solenoid Valve doesn't click, then it's probably an electrical problem. If it does click, then remove the Fuel Solenoid Valve (the 17mm brass bolt head behind the bleed screw). The brass "bolt" is a threaded spindle - the fuel comes out of the end of it and into the Injector Pump. Pushing the "bolt" tight against the solenoid body get someone to turn the Control Panel ON and then immediately OFF. If the solenoid is working a LOT of diesel will come spurting out, so have a container or a big rag to catch it.
7. If you've got to this point, then the fuel is being delivered to the Injector Pump, but you're probably not certain if it's getting to the Injectors properly. Before getting out your wallet, try the Desperation Starting section.
Checking the Starter Circuit
When the Start button is pressed, the Earth Isolation Relay and the Starter Relay are activated. The Earth Isolation Relay connects the battery ground terminal to the generator chassis. The Starter Relay supplies 12V to the Starter Solenoid (which use the Chassis as ground). The Starter Motor obtains power from a direct feed from the Starter Battery.
Check the following:
1. Remove the Control Panel and check that there is 12V on Connector 12, when the Start button is pressed.
2. Check that the 12V cables to the starter motor are connected and tight. Also check that the main cables coming from the battery are 12V.
|
|
|


3. Check the Starter Solenoid signal wire (white on our generator). Should get 12V when the start button is pressed. If not, then check the 15A Fuse and the Starter Relay (both located beneath the electrical connection panel on the generator). Only way of testing the relay is to swap it out for a new one.
4. Check the Earth Isolation Relay. This is positioned underneath the oil filter. It is supposed to activate when the Heat or Start buttons are pressed and will connect the battery ground terminal to the generator chassis. Both the Starter motor and the Heat Plugs use the generator chassis as their ground. (I believe that this "clever" circuit is to help prevent catalytic corrosion, but it can really throw you, if you are not aware of it.) It has some diodes on a flimsy piece of wire between the terminals.
a. Check that you get 12V on the relay signal wire when the Start button is pressed.
b. Bypass the Earth Isolation Relay by using a heavy-duty, starter-battery jumper lead. Connect one end of the jumper lead from the generator chassis (at generator end away from rotating parts) and connect the other end of the jumper lead to the negative battery lead on the engine starter motor. If the Starter Motor turns over then there is a fault with the Earth Isolation Relay. (NOTE. You can bypass the Earth Isolation Relay this way as an emergency measure, but when the generator has been started, the jumper lead should be removed - it's only needed for starting the generator, not running it. I did this for a few months when the Earth Isolation Relay failed and I was waiting for a replacement).
c. If the Bypass works, then the Earth Isolation Relay might be faulty or there might be a dodgy connection on the diodes wired across the terminals. Remove it and test with a separate 12V signal wire.
5. If the Starter Solenoid is operating then it has to be the Starter Motor at fault. Either a loose connection in Starter Motor feed cables or an internal fault - brushes, etc. Get out your wallet.
Desperation Starting
After trying the investigations above or, if you've done extensive work on the generator, then you might want to try this method. Remember that if you've turned the engine over a few times, you risk injecting too much fuel - that in effect floods the combustion chamber reducing your chances of an engine start, so maybe have a beer and wait until tomorrow.
Another source of complication is the seawater pump. During repeated start attempts the seawater pump is still turning over and filling the exhaust hose muffler/water trap. This means the engine is trying to start against back pressure. (You've all heard of jamming a potato in someone's car exhaust.) You can either close the sea cock (but turn on as soon as the engine starts), or as I prefer, disconnect the sea water outlet pipe from the exhaust elbow. Sea water will spray out, but it's better than damaging your sea water system.
You need to ensure lots of fresh air is entering the engine, so the air filter should be taken out of the system.
You need to eliminate back pressure in the exhaust, so disconnect the exhaust from the exhaust elbow.
Heat is another often overlooked process in starting a diesel engine. Heat is a result from compression. Compression is often lowest when attempting to start. Heat can be increased by turning the engine over faster and leaving the glow plugs to heat longer - you could even check that the valves are set as they should be.
So, to fix a generator that turns over, but will not start.
1. Turn on the battery charger or put a jumper lead onto the domestic batteries.
2. Turn on the Control Panel and bleed diesel from the Fuel Solenoid Valve. Turn off.
3. Remove the top panel of the Air Filter Housing.
4. Disconnect the sea water outlet pipe from the Exhaust Elbow. (Point it into a bucket or somewhere safe because lots of sea water will spray out when the engine starts.)
5. Remove the rubber exhaust hose from the Exhaust Elbow. (When it starts, you will have poisonous fumes pumping into your engine room, so only run for a few seconds before shutting down and reconnecting the exhaust system.)
6. Get someone to press the Start button while you "crack" the Injector Nuts. Hopefully it will start.
7. If it doesn't start, then you need to isolate the fuel system. Spray a small amount of WD-40 into the air intake while trying to start. WD-40 is a light oil that enters the cylinder pre-mixed with air. It's a little more flammable than diesel, but not as harsh as starting fluid. If the engine will start on WD-40, but shuts down immediately after you stop spraying then the problem is assuredly fuel related.
If these tricks do not start the stubborn beast, then the next step is to get out your wallet and call a Diesel Mechanic.
Neville Howarth
December 2016