
After 30,000 miles and 16 years, Alba's teak deck was starting to show signs of wear. We had deep ridges at the bow and along the side decks where we take the most waves. The teak planks were originally screwed down to a fibre glass deck and, in many places, the original, 12mm thick deck had worn down to a point where the teak plugs covering the screws were starting to pop out. I was replacing 100 screws and teak plugs every year, which is a tedious task. With another 15,000 miles and three or four years to go before we completed our circumnavigation, it was obvious that the deck would have to be replaced before we sell the boat.

Thailand is renowned for quality teak decks, so we decided to bite the bullet and get the deck replaced in Phuket. Not only would it be cheaper, but we would have the pleasure of a new deck for the remaining years, hopefully without any more maintenance. The cockpit and the small aft coach-roof teak seemed to be in good condition, so I excluded them from the work programme.
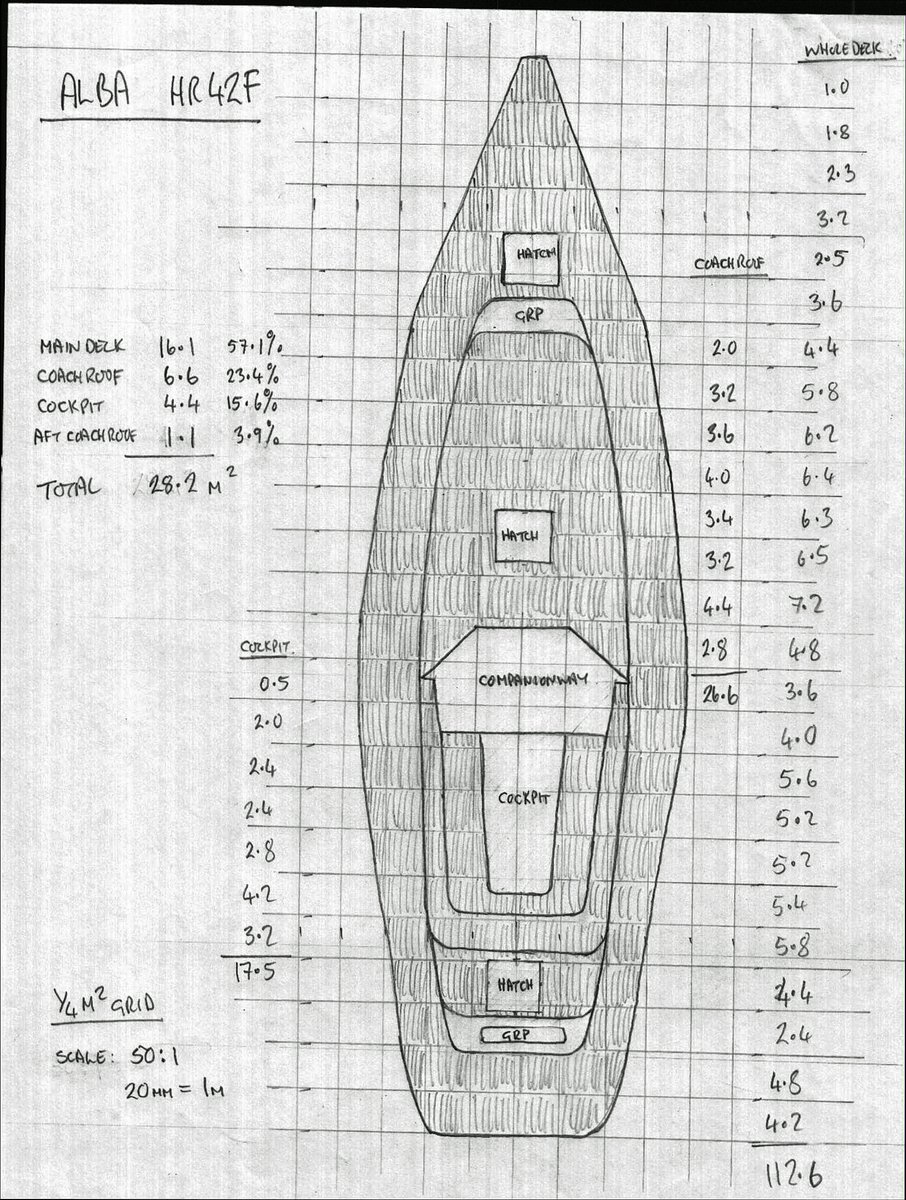
I measured the deck area by drawing the deck roughly to scale on a piece of graph paper and then marking out half metre squares. The result was that we needed to replace 22.7 square metres of teak decking.
We had quotes from three suppliers in Phuket, Thailand: Precision Shipwright Services, Phuket Inter Woodwork and Yacht Repair. We've had good reports of the quality of work by all three companies.
Yacht Repair quoted the lowest cost (about 5% cheaper than Phuket Inter Woodwork), but Marly, the owner, wanted to work on the boat at Yacht Haven where there is no a haul-out facility. It would have been cheaper to leave the boat in the water, but Yacht Haven is a long way from Phuket Town and stuck in the middle of nowhere. We wanted to haul out and also had other reasons to take our mast off, so Yacht Repair were eliminated.
Precision Shipwright Services are based at Boat Lagoon, run by an Australian called Scott and they have a reputation as a very professional organisation, but their price was nearly 50% more than Phuket Inter Woodwork, so they were eliminated. (Later, I had other work done by them and they were very efficient.)

Phuket Inter Woodwork is a Thai-owned company run by a husband and wife team. Toe is the master carpenter and his wife Nai acts as the Project Manager. Nai speaks excellent English and I felt confident that she would deliver a good job so, as the price was very reasonable, I gave her the contract.
We were planning to cruise in Thailand during the pleasant, dry North-east Monsoon (Jan-Mar) and have the work done later in the year in October/November, but Nai convinced me that it would be much better to get the work done in the dry season. Despite the fact that they always erect tents over the boat, rain will stop play in the South-west Monsoon and the job takes much longer.
So, in the middle of January 2016, we were hauled out and I started to get the rigging ready to lift the mast. The following morning, the mast was removed by Nai's team. I was only charged for the cost of the crane hire (£140) - her very efficient and professional team came for free, but I did all of the preparation work of removing the boom and loosening all of the bottle screws.
Nai's team then started to erect scaffolding and, by the end of the day, there was a very sturdy tent erected over the boat, ready to start work. Toe came with a digital camera and took pictures of every part of the deck, so that they would replicate the features of the original deck.
I spent one and a half days removing the deck fittings, which Nai's team would have done, but I wanted to do it myself without hordes of Thai workmen pulling down head-linings and causing chaos below decks - they can be a little too enthusiastic sometimes.
|
|
|


The mast is deck stepped and I decided to remove the deck plate. I was a little worried about how it was attached to the deck and the possible problems that I might have replacing it and also the effect of compression of the new teak on the rig stability. I found that the 12mm diameter machine screws were screwed into threaded holes in a 30mm thick fibreglass pad moulded into the underlying deck above the compression post in the saloon. It all looked fairly easy to replace.
I didn't want to remove the rigging chain places from the deck, so Nai's team were told to carefully cut around the stainless steel plates on the deck and the new deck would be butted up to the old teak with a decorative border around the chain plates.
|
|
|


With our jobs done, we went on holiday to Myanmar for three weeks and left them to the messy job of removing the old teak deck and painting the blue stripes on our hull with Awlgrip.
I'd told Nai that I wanted to inspect the deck before they filled all of the old screw holes and, sure enough, when we returned, the teak had been removed and I could see that all of the old screws had been removed - she's a very efficient and trustworthy project manager.
|
|
|


The underlying GRP deck looked to be in good condition, so I gave Nai the go-ahead and the following day the screw holes were being countersunk and filled with epoxy filler. A couple of days later, the GRP deck had been sanded and the carpenters were set loose.
They used epoxy to stick pieces of 2" * 1" pine down to the GRP deck every 300mm along the length of the side decks and then laid two teak planks along both sides of the deck, starting from the outside - two planks a day.
The teak was all quarter sawn and looked (to my inexperienced eye) to be fine grained and as good as, or even better than the original Hallberg Rassy deck. The planks were 35mm wide, 12mm thick and had a 2mm wide by 9mm deep rebate on both side of the plank, which gave the requisite 4mm caulking groove. They clamped the planks down with small wedges using the 2" * 1" pine to hold the planks down and sideways. As required, they also used heavy lead weights to hold planks down. Small 4mm thick spacers were temporarily placed in the caulking grooves to maintain the 4mm gap.
|
|
|


The adhesive they used was wood-coloured Sikaflex 298 and they painted Sikaflex 215 primer onto the GRP deck and the bottom of every teak plank. Wherever the long planks butted up against obstructions like the chain-plates, they left a rough end to later tidy up and add surrounding pieces of teak.
The work was fast and meticulous and, at times, we had ten carpenters working on the deck. After seven days, the bulk of the main deck was laid. At the end of two weeks they had finished the coach-roof and were working on very detailed jobs, fitting edging planks and cutting 4mm grooves where required. Five days later the carpentry was complete. They meticulously painted Sikaflex 215 Primer into every grove, then applied the Sikaflex 290 DC caulking compound.
|
|
|


They waited five days for the Sikaflex caulking to set and then two guys spent a day sanding the deck with orbital sanders with 50 grit sandpaper. It was then simple a matter of replacing all of the deck fittings. In most cases (including the 25 bolts for the genoa track), the holes in the teak were drilled from inside the boat. All holes were chamfered with a 45 degree recess bit and Sikaflex 291 was used to bed the fittings.
|
|
|


|
|
|


Six months later, we started to develop mildew - I guess because it was new wood and we had a lot of rain in Malaysia. We used an anti-mildew solution - in a bucket of fresh water (or sea water if necessary), add 2/3rds cup of bleach, 3-4 tablespoons of tri-sodium phosphate (available at any paint/hardware store) and a dash of dish detergent. We wiped (not scrubbed) the deck with a sponge, taking care to wipe across the grain so as not to remove the softer pith from the wood. A surprising amount of dirt came off the surface, which was hosed off with fresh water. We'll do this once a year.
After nine months, the deck was a nice silver colour.